How to Get Word to Show Spelling Errors Again
Microsoft Editor runs in Word for Microsoft 365 to analyze your document and offering suggestions for spelling, grammar, and stylistic bug, similar making sentences more concise, choosing simpler words, or writing with more than formality.
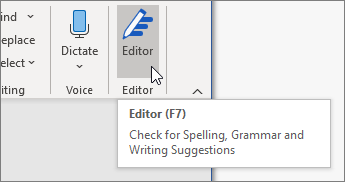
To apply Editor, on the Dwelling tab cull Editor.
Reviewing suggestions
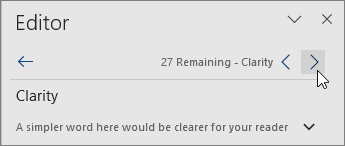
To focus on the bug you care most nearly, choose a correction or refinement type, like Grammar or Clarity. Then, utilise the arrows nearly the peak of the pane to step through each of that blazon of consequence.
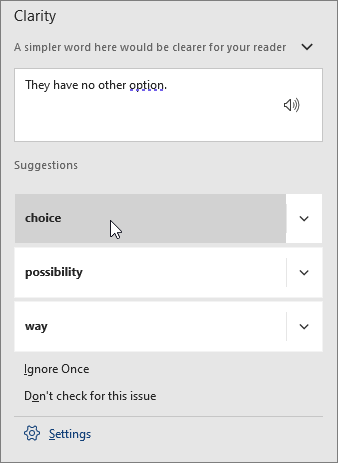
Choose a suggestion to incorporate it into your certificate. If you don't like the suggestion, choose Ignore Once. Or, if yous never want this type of suggestion, choose Don't cheque for this upshot.
Note:If you change your listen well-nigh an event you ignored, shut and reopen the certificate, and go back to Editor. Editor will find the issue again.
Tailor what Editor checks for
Past default, Editor checks for several categories of issues, and the suggestions may or may not accommodate your writing style. To finely melody Editor for suggestions yous want, do the post-obit:
-
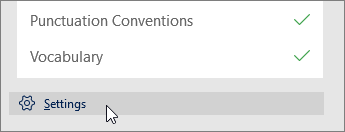
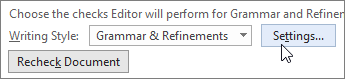
In the Editor pane, choose Settings.
-
In the Word Options dialog box, next to Grammar & Refinements, choose Settings.
-
Scroll through the list of options. Select problems you desire Editor to check, and clear the problems you lot want Editor to ignore.
Note:ChoosingReset All returns to the default settings.
-
Cull OK.
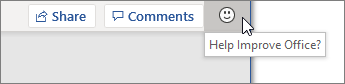
Tip:Editor is designed to empower you to bring out the best in your writing. We are continually making updates to its suggestions and experimenting to learn which suggestions are most welcome. If y'all have feedback for us, choose Assist Better Part? at the top of the Word window to open the Feedback pane.
You might notice Editor'due south reddish, bluish, and purple underlines in your document fifty-fifty when the Editor pane is closed. That'southward because Editor is e'er running in the background, checking for spelling, grammer, and some style issues.
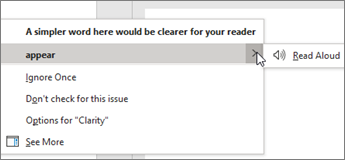
Right-click the underlined text to see the proffer. Use context menu to:
-
Listen to the suggestion by clicking the arrow next to the suggestion so choosing Read Aloud.
-
Skip this instance of the upshot by choosing Ignore Once.
-
Tell Editor to stop checking for this issue past choosing Don't bank check for this effect.
-
Fine melody the settings for this blazon of issue by choosing the Options link.
-
Become more information near the effect by choosing Encounter More.
Your certificate might exist written in more than one language, or you might want to switch to another language for Editor to check. If you are set up to use multiple authoring languages (File > Options > Linguistic communication), Word detects the language yous're writing in, and Editor volition check for issues in that linguistic communication.
However, you might be writing in a language that Word doesn't observe automatically. In that case, you lot can get Editor to cheque text in that linguistic communication by selecting the text and going toReview>Language >Set Proofing Language, and so choose your linguistic communication.

When Editor is checking more than one language, the Editor pane lists corrections and refinements for each language in the document.
For information most the problems that Editor checks in various languages, see Editor's spelling, grammar, and refinement availability by language.
When yous piece of work on documents in Word on the web, Editor provides a rich set of features that are coming soon to Word for Windows. Fifty-fifty when you lot're not using Give-and-take, the Editor browser extension helps yous with writing on websites similar LinkedIn, Twitter, Facebook, and Gmail.
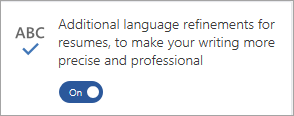
When you lot are working on your resume, Editor checks for problems like reference to beginning person, vague verbs, unsuitable expressions, and more.
-
Go to Review > Resume Assistant.
-
Enter the Office and Industry. At the bottom of the Resume Assistant pane, switch Editor's resume checking on or off.

Discussion marks spelling, grammar, and stylistic problems with an underline. Right-click the underlined discussion, and then choose the proposition yous want, or learn more than about the error and how to correct it.
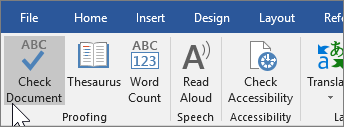
Or, open up the Editor pane to address problems by category.
-
On the Review tab, select Check Document.
-
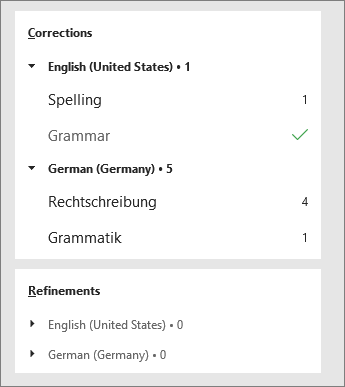
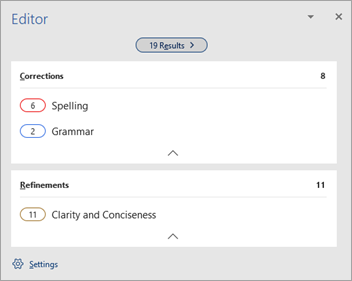
The Editor pane categorizes spelling, grammar, and stylistic bug.
-
Click each category to accost the issues.
Note:For keyboard shortcuts in the Editor pane, at that place's no need to press Alt. But apply the underlined letter of the alphabet to select the control (like i for Ignore Once, m for Ignore All, etc) .
-
In the Editor pane, click Settings.
-
Under When correcting spelling and grammar in Word, select Settings
-
For Writing Fashion, select Grammar & Refinements .
-
Scroll down to see all of the options available, and select or clear the rules you want. The settings use to all the documents that you edit, not but the current one.
Requirements and availability of the Editor pane include the post-obit:
-
Internet connection: Brand sure your connection is working.
-
Intelligent Services switched on: Go to File > Options > General and turn on Office Intelligence Services.
-
Linguistic communication availability: For information well-nigh the bug that Word checks for in various languages, encounter Editor's spelling, grammar, and refinement availability by language.
Word marks spelling, grammar, and stylistic issues with an underline. Control-click the discussion or phrase and choose ane of the options.
If Word incorrectly underlined a discussion as misspelled and you want to add that word to your dictionary and so that Give-and-take will properly recognize information technology in the hereafter, run into Add or edit words in a spell check lexicon.
If spelling or grammatical errors aren't underlined, you lot might demand to plough on automatic spelling and grammar checking, equally follows.
Plow on (or off) automated spelling and grammar checking
-
On the Give-and-take bill of fare, click Preferences > Spelling & Grammar.
-
In the Spelling & Grammer dialog box, under Spelling, check or articulate the Check spelling every bit you type box.
-
Under Grammer, check or clear the Check grammar as you lot type box.
-
Close the dialog box to save your changes.
-
On the Review tab, click Spelling & Grammar.
-
Give-and-take displays the issues it finds in the Spelling & Grammar dialog box.
-
To address an issue, do one of the following:
-
Type the correction in the box and then click Change.
-
Under Suggestions, click the word you lot want to utilize, and and so click Change.
To skip the error, do one of the following:
-
Click Ignore One time to skip only that case of the error.
-
Click Ignore All to skip all instances of the fault.
-
For a grammatical error, click Side by side Sentence to skip that instance of the error and move to the side by side fault.
To skip a misspelled word in all documents, click Add to add it to the dictionary. This only works for spelling. You can't add custom grammar to the dictionary.
-
-
After you correct, ignore, or skip an event, Word moves to the adjacent one. When Word finishes reviewing the document, you lot'll see a message that the spelling and grammar check is consummate.
-
Click OK to return to your certificate.
You can clear or reset the list of Ignored Words and Grammar and then Word will check for spelling and grammer problems you previously told it to ignore.
Annotation:When y'all reset the listing of Ignored Words and Grammar, the list is cleared simply for the currently open document. Any spelling or grammar problems yous told Word to ignore in other documents won't exist afflicted.
-
Open up the document that needs to be checked.
-
On the Tools menu, point to Spelling and Grammar, and so click Reset Ignored Words and Grammar.
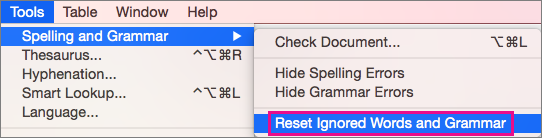
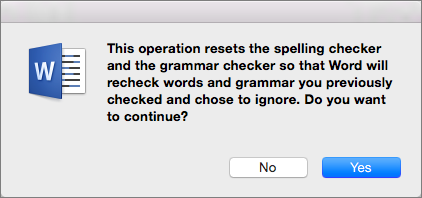
Word displays a warning about the operation resetting the spelling checker and the grammar checker.
-
Click Yes to proceed.
-
Click the Review tab, and and then click Spelling & Grammar to bank check spelling and grammar.
Word marks potential spelling errors with a red squiggly line, and potential grammatical errors are marked with a bluish squiggly line.
Right-click on the underlined give-and-take or phrase and choose a correction, or ignore the suggestion.
Annotation:If Word is flagging words as misspelled but you take it spelled the style you want information technology, select Add to Dictionary to teach Word not to flag that word equally misspelled in the futurity. For more data on this see: Add or edit words in a spell check lexicon.
If you don't want Office to mark potential errors with squiggly lines while you are working, you tin turn automatic spelling and grammar checking off:
-
On the File carte, click Options, and so click Proofing.
-
Select or clear the Check spelling as you type andMarking grammer errors as you type check boxes.
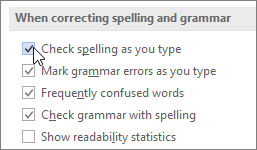
Note:You can turn the spelling checker on or off for the document you're working with or for all new documents. Select an option in the Exceptions for listing, and then select or clear the Hibernate spelling errors in this certificate only and Hide grammar errors in this document but bank check boxes.
If you don't desire Word to check grammar at all (either when running a spell check or automatically as you type), you can plow it off:
-
On the File menu, click Options, and so click Proofing.
-
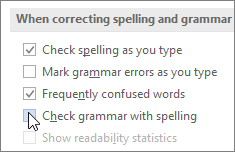
Clear the Marking grammar errors as y'all blazon and Check grammar with spelling check boxes.
-
On the File menu, click Options > Proofing> Recheck Document.
-
Click Yes when yous come across the alert bulletin about resetting the spelling and grammar checker.
-
Click OK in the dialog box to get back to the document, and and then run the spelling and grammer checker again.
Source: https://support.microsoft.com/en-us/office/check-grammar-spelling-and-more-in-word-0f43bf32-ccde-40c5-b16a-c6a282c0d251
0 Response to "How to Get Word to Show Spelling Errors Again"
Postar um comentário